
Oreo Sushi Rolls
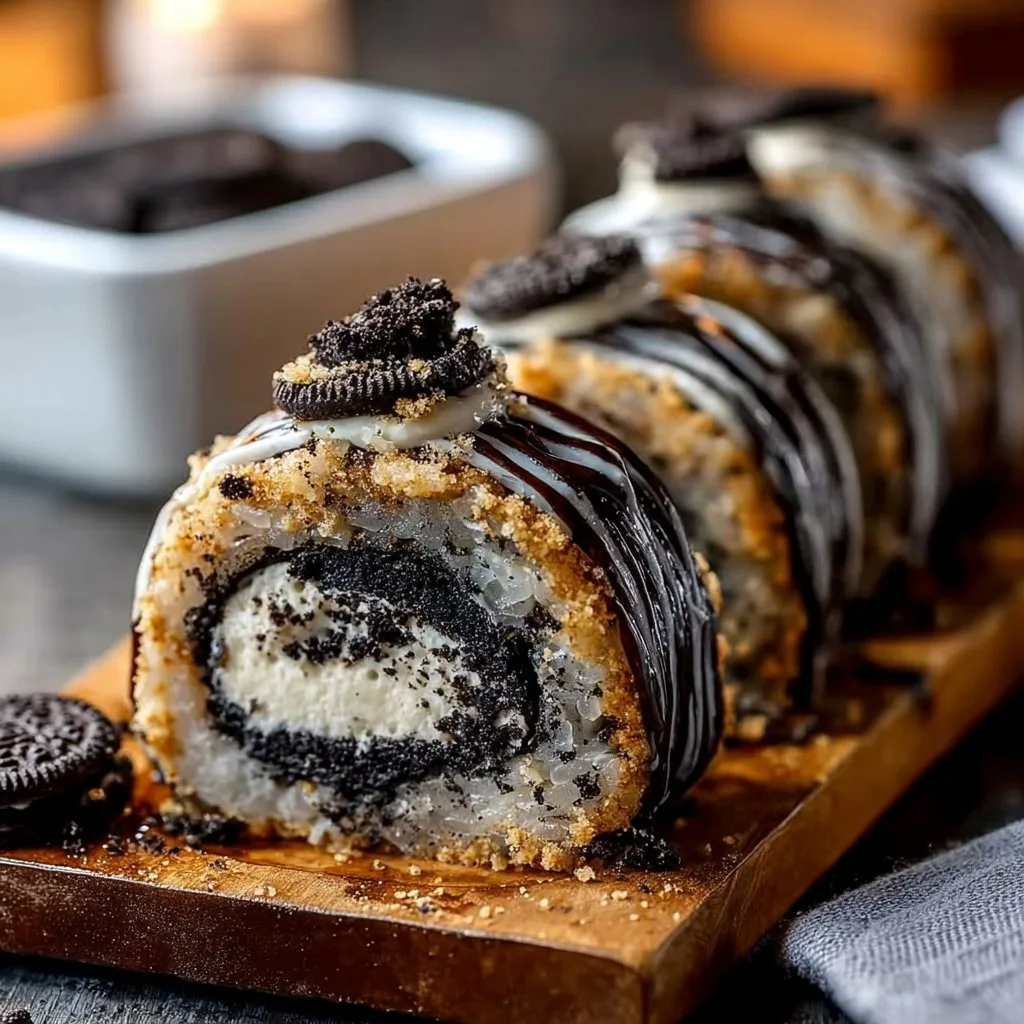
Oreo Sushi Rolls offer a fun and inventive twist on classic sushi, combining the beloved taste of Oreos with a creamy filling that’s sure to delight anyone with a sweet tooth. The soft, chewy dough made from crushed Oreos creates a unique base, while the sweet cream cheese filling adds richness and flavor. This dessert is not only visually appealing but also incredibly easy to make, making it perfect for parties, movie nights, or simply as a treat to satisfy those sweet cravings.
Whether you’re looking to impress guests with a quirky dessert or simply want to indulge in a beloved snack, these Oreo Sushi Rolls stand out. They are fun to prepare and even more enjoyable to eat. The combination of textures—from the crunch of the Oreo dough to the smooth filling—creates a delightful experience in each bite. Best served chilled, these rolls are ideal for any occasion, whether it’s a casual gathering or a special celebration.
Prep Time: 10 min | Chill Time: 45 min | Total Time: 55 min
How to Make Oreo Sushi Rolls
Ingredients
- 24 Oreos
- 4 oz cream cheese (for the dough)
- 3 oz cream cheese (for the filling)
- 2 tablespoons powdered sugar
- 1/2 teaspoon vanilla extract
- 2 tablespoons heavy cream (optional)
- 2 tablespoons Oreo crumbs or mini Oreos for garnish
- 2 tablespoons chocolate drizzle or melted white chocolate (optional)
Step-by-Step Instructions
Crush the Oreos: Start by placing 24 Oreos in a food processor. Pulse until finely ground, ensuring that the cream filling mixes well with the cookie crumbs. This creates a smooth base for your sushi dough.
Mix the Dough: In a bowl, combine the crushed Oreos with 4 oz of softened cream cheese. Mix until you form a soft dough that holds together. The cream cheese adds richness, helping bind the cookie crumbs into a manageable mix.
Roll Out the Dough: Place the dough between two sheets of parchment paper. Using a rolling pin, roll it out into a thin rectangle about 1/4 inch thick. This gives you a nice surface area to work with when adding the filling.
Chill the Dough: Transfer the rolled dough to the fridge and chill it for 10–15 minutes. Chilling helps firm up the dough, making it easier to spread the filling.
Prepare the Filling: In another bowl, beat together 3 oz cream cheese, powdered sugar, vanilla extract, and heavy cream (if using) until smooth and fluffy. This filling will add a creamy and sweet layer to your sushi rolls.
Spread the Filling: Once the dough is chilled, spread the filling evenly over the top, leaving a small border at the edges. Be sure to cover the surface well for optimal flavor in every bite.
Roll It Up: Carefully roll the dough tightly into a log, using the parchment paper to guide you. This technique helps form a tight roll, ensuring that none of the filling escapes.
Chill Again: Wrap the rolled log in parchment paper and chill for at least 30 minutes. This allows the roll to set properly, making it easier to slice.
Slice the Rolls: Using a sharp, clean knife, slice the chilled log into sushi-style rounds. Clean the knife with a damp cloth between cuts to keep the edges neat.
Garnish and Serve: Finally, garnish with Oreo crumbs or mini Oreos and drizzle with chocolate if desired. This finishing touch adds visual appeal and extra flavor!
Pro Tips
Use softened cream cheese: Make sure your cream cheese is at room temperature before mixing. This helps achieve a smoother filling without lumps.
Chill the dough thoroughly: Don’t skip the chilling steps! Chilling solidifies the dough, which makes rolling it easier and prevents it from becoming too sticky.
Clean your knife: When slicing, a clean knife helps to keep the edges sharp, giving your rolls a more polished look. Wipe with a damp cloth as needed.
Experiment with fillings: While the cream cheese filling is delicious, consider adding other flavors like peanut butter or nutella for a different twist.
Presentation matters: Using colorful garnish or a drizzle of chocolate not only enhances the taste but also makes the dish more visually appealing for guests.
Why You’ll Love This Recipe
Oreo Sushi Rolls are a delightful combination of flavors and textures: the chocolatey taste of Oreos, the smooth filling from cream cheese, and optional sweetness from chocolate drizzle come together perfectly. The simplicity of this recipe means you can whip it up quickly, making it a fantastic choice for impromptu gatherings or special occasions.
With no complicated ingredients or cooking techniques involved, even novice cooks can shine with this dessert. Plus, they cater to various tastes; many can enjoy them without dietary restrictions, although they’re not suitable for those with lactose intolerance. The sweet flavors appeal to both kids and adults alike!
How to Serve Oreo Sushi Rolls
When it comes to serving Oreo Sushi Rolls, presentation is key. You can arrange them artfully on a platter and sprinkle with extra Oreo crumbs or garnishes like mini Oreos for a fun touch. Drizzling some melted chocolate over the top can also add an elegant flair.
For beverages, consider pairing them with a glass of cold milk, coffee, or even some sweet tea—anything that complements the chocolatey and creamy flavors. This dessert is perfect for a party setting, movie nights, or as a special treat for family gatherings.
How to Store Oreo Sushi Rolls
To keep your Oreo Sushi Rolls fresh, store them in an airtight container in the refrigerator. They can last up to 4-5 days. If you want to extend their shelf life, you can also freeze them. Wrap the rolled log tightly in plastic wrap and place it in a freezer-safe container; they can keep well for about a month.
When you’re ready to enjoy the leftovers, simply thaw in the fridge and slice to serve. Avoid refreezing after thawing, as it might affect the texture.
Tips for Making Oreo Sushi Rolls
Timing is essential: If you want to serve them at a specific time, plan ahead to ensure you have enough chilling time.
Use parchment paper wisely: It prevents sticking, making it easier to roll and slice the sushi.
Taste as you go: Feel free to adjust the sweetness of the filling by adding more or less powdered sugar based on your preference.
Variations
Vegan version: Replace Oreos with a vegan alternative and use plant-based cream cheese to create a completely dairy-free dessert.
Nutty twist: Add crushed nuts, like walnuts or pecans, into the filling for an added crunch.
Coconut flavor: Mix in some shredded coconut to the cream filling for a tropical flair—this pairs wonderfully with the chocolate in Oreos!
Nutrition Information
- Serving Size: 2 rolls
- Calories: 250
- Protein: 3g
- Carbs: 30g
- Fat: 14g
- Fiber: 1g
- Sugar: 15g
This recipe is rich in sugars and fats, primarily due to the Oreos and cream cheese. While it’s a decadent treat, moderation is key, especially if you’re watching your sugar intake.
Storage and Reheating
To reheat Oreo Sushi Rolls, you likely won’t need to, as they are best served chilled. However, if storing or reheating, avoid the microwave; instead, let them sit at room temperature for a short while before serving. This helps regain some of the creamy texture.
Customization Ideas
Feel free to adjust flavors and toppings based on personal taste. Offer options for adding sprinkles or different flavored chocolates for drizzling. If you want to bring in a bit of tartness, a layer of fruit preserves can also provide a nice contrast to the sweetness.
Common Mistakes to Avoid
Not chilling long enough: Ensure you give ample chilling time; this keeps the dough firm for easy rolling.
Using cold cream cheese: Always let cream cheese sit out until softened for a creamy texture.
Not cleaning the knife: Failing to clean the knife between cuts will lead to messy slices—keeping it clean gets the best results!
Forgetting to leave an edge for rolling: If you spread the filling too close to the edges, it could ooze out when you roll—be mindful of the borders.
Overmixing the filling: Mix just until smooth; over mixed filling can become too airy and lose the thick, creamy consistency you want.
Serving Occasions
Oreo Sushi Rolls are perfect for various occasions. They shine at birthday parties, family movie nights, and even holiday gatherings. They offer a fun twist on traditional desserts, delighting kids and adults alike. Plus, their playful name and appearance make them great conversation starters!
Why Make This Recipe
This recipe stands out because it combines the nostalgia of Oreos with an interactive dessert-making experience. Unlike typical desserts that require baking or special skills, Oreo Sushi Rolls are effortlessly fun and straightforward. Plus, they cater to all ages—children love helping out with the assembly, while adults can appreciate the creativity involved.
FAQs
Can I use gluten-free Oreos?
Absolutely! Using gluten-free Oreos allows those with gluten sensitivities to enjoy this dessert without worry.How do I make these ahead of time?
You can prepare the rolls a day in advance. Just make sure to store them properly in the fridge until you’re ready to serve.Can I use low-fat cream cheese?
Yes, low-fat cream cheese works well. However, note that the texture and taste might be slightly different.What can I do if my dough is too crumbly?
If your dough isn’t holding together, mix in a bit more cream cheese until it reaches a workable consistency.Can I substitute ingredients?
Yes! Feel free to get creative with your fillings or use alternative cookies if you want to experiment with different flavors.
Disclaimer
Nutrition values are approximate and can vary based on ingredient brands and quantities used. Always check your labels for the most accurate information. Enjoy making these delightful Oreo Sushi Rolls and indulge in their creamy, chocolate goodness!
Print
Oreo Sushi Rolls
- Total Time: 55 minutes
- Yield: 4 servings 1x
- Diet: Vegetarian
Description
Oreo Sushi Rolls offer a fun twist on classic sushi, combining Oreos with a creamy filling that delights anyone with a sweet tooth.
Ingredients
- 24 Oreos
- 4 oz cream cheese (for the dough)
- 3 oz cream cheese (for the filling)
- 2 tablespoons powdered sugar
- 1/2 teaspoon vanilla extract
- 2 tablespoons heavy cream (optional)
- 2 tablespoons Oreo crumbs or mini Oreos for garnish
- 2 tablespoons chocolate drizzle or melted white chocolate (optional)
Instructions
- Crush the Oreos: Start by placing 24 Oreos in a food processor. Pulse until finely ground.
- Mix the Dough: Combine crushed Oreos with 4 oz of softened cream cheese in a bowl until you form a soft dough.
- Roll Out the Dough: Place the dough between two sheets of parchment paper and roll it into a thin rectangle.
- Chill the Dough: Transfer the rolled dough to the fridge and chill it for 10–15 minutes.
- Prepare the Filling: Beat together 3 oz cream cheese, powdered sugar, vanilla extract, and heavy cream until smooth.
- Spread the Filling: Once the dough is chilled, spread the filling evenly over the top, leaving a small border.
- Roll It Up: Carefully roll the dough tightly into a log, using the parchment paper to help.
- Chill Again: Wrap the rolled log in parchment paper and chill for at least 30 minutes.
- Slice the Rolls: Using a sharp knife, slice the log into sushi-style rounds.
- Garnish and Serve: Garnish with Oreo crumbs or mini Oreos and drizzle with chocolate if desired.
Notes
Make sure to chill the dough thoroughly for best results, and use clean knives for neat slices.
- Prep Time: 10 minutes
- Cook Time: 0 minutes
- Category: Dessert
- Method: No-Bake
- Cuisine: American
Nutrition
- Serving Size: 2 rolls
- Calories: 250
- Sugar: 15g
- Sodium: 200mg
- Fat: 14g
- Saturated Fat: 7g
- Unsaturated Fat: 6g
- Trans Fat: 0g
- Carbohydrates: 30g
- Fiber: 1g
- Protein: 3g
- Cholesterol: 15mg