

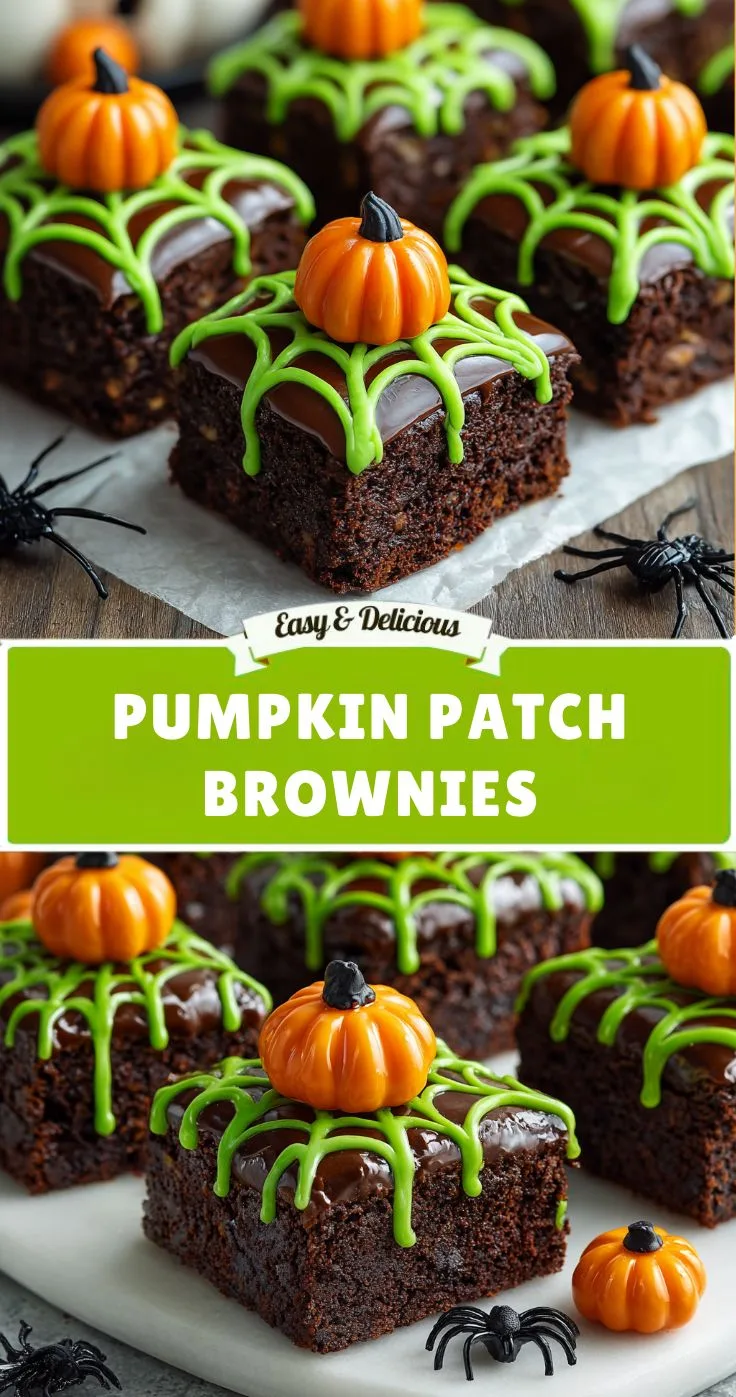
Halloween baking does not have to be complicated to look impressive. These Pumpkin Patch Brownies are the perfect example: start with a batch of rich, fudgy brownies, then transform them into an adorable miniature pumpkin patch with chocolate frosting, crushed cookies, candy pumpkins, and green icing vines.
The finished brownies have several fun layers of texture and flavor. The brownie base is soft and chocolatey, the frosting adds extra richness, crushed chocolate cookies create a crumbly “soil” effect, and little candy pumpkins bring the whole Halloween scene to life. Green icing vines and leaves complete the look.
These brownies are especially fun because you do not need advanced decorating skills. There is no need to shape complicated fondant pumpkins or create detailed cake decorations. The candy pumpkins do most of the work, while the green icing can be piped in simple lines and leaves.
They are perfect for Halloween parties, school celebrations, family baking afternoons, fall gatherings, or a festive dessert table. Kids can also help decorate the brownies, making this recipe a fun activity as well as a delicious treat.
With only a few decorating ingredients and about 45 minutes from start to finish, these Pumpkin Patch Brownies are an easy way to make ordinary brownies feel extra special for Halloween.
Why You’ll Love These Pumpkin Patch Brownies
There are plenty of reasons to add these brownies to your Halloween baking list.
Easy to Make
The recipe begins with a boxed brownie mix, so you do not have to prepare a brownie batter from scratch. Simply follow the package directions, bake the brownies, let them cool, and concentrate on the fun decorating part.
Adorable Halloween Design
The combination of chocolate cookie “dirt,” candy pumpkins, and green icing creates the appearance of a miniature pumpkin patch. They look festive without requiring complicated decorating techniques.
Great for Parties
Because the brownies are baked in a 9×13-inch pan and cut into squares, they are easy to portion and serve. Each piece can be decorated with at least one candy pumpkin, giving every guest their own little pumpkin patch brownie.
Fun for Kids
Children can help sprinkle the cookie crumbs, place the candy pumpkins, and add the green icing. It is a simple Halloween baking project that lets everyone participate.
Easy to Customize
You can use different types of candy pumpkins, add extra chocolate decorations, or change the design of the vines and leaves. The basic idea is flexible enough to fit almost any Halloween dessert table.
Pumpkin Patch Brownies Recipe Details
| Detail | Information |
|---|---|
| Prep Time | 15 minutes |
| Cook Time | 30 minutes |
| Total Time | 45 minutes |
| Yield | About 12 brownies |
| Pan | 9×13-inch |
| Skill Level | Easy |
| Best For | Halloween parties, fall gatherings, family baking |
Ingredients
You only need a handful of ingredients to turn simple brownies into a festive Halloween dessert.
1. Brownie Mix
Use 1 box of brownie mix, along with whatever ingredients are required on the package. This keeps the recipe quick and convenient.
If you already have a favorite homemade brownie recipe, you can absolutely use it instead. The important thing is to bake the brownies in a 9×13-inch pan so you have enough surface area for the pumpkin patch decorations.
2. Chocolate Frosting
You will need 1 cup of chocolate frosting.
The frosting creates the first decorating layer and helps the crushed cookies stick to the brownies. It also adds another layer of chocolate flavor.
3. Crushed Chocolate Cookies
Use 1 cup of crushed chocolate cookies, such as chocolate sandwich cookies.
These crumbs are what create the “dirt” effect. For the most realistic pumpkin patch appearance, crush the cookies into a mixture of fine crumbs and slightly larger pieces rather than turning everything into a completely smooth powder.
4. Candy Pumpkins
Use your favorite candy pumpkins. Candy corn pumpkins and gummy pumpkins both work well.
These little pumpkins are the centerpiece of the decoration, so choose a type that fits the size of your brownies.
5. Green Icing or Gel
Green icing or decorating gel is used to create the vines and leaves around the pumpkins.
You do not need to make complicated shapes. Simple curved lines with a few small leaf shapes are enough to make the brownies look like a pumpkin patch.
How to Make Pumpkin Patch Brownies
Step 1: Bake the Brownies
Begin by preparing the brownie mix according to the package directions.
Pour the batter into a prepared 9×13-inch pan and bake according to the package instructions.
Keep an eye on the brownies toward the end of the recommended baking time. For an especially fudgy texture, you can slightly underbake them by about 2–3 minutes, as long as the brownies are properly cooked and set enough to decorate.
Once baked, remove the pan from the oven and allow the brownies to cool completely.
This step is important. If you try to decorate warm brownies, the frosting can melt and become difficult to spread, while the cookie crumbs may sink into the frosting.
Step 2: Cool Completely
Allow the brownies to cool completely in the pan before beginning the decorating process.
For especially clean squares, you can also let the brownies cool and firm up before decorating. If necessary, chilling them briefly can make slicing easier later.
Do not rush this step. A cool brownie surface gives you much better control over the frosting and decorations.
Step 3: Add the Chocolate Frosting
Spread 1 cup of chocolate frosting evenly over the top of the cooled brownies.
Use a spatula or the back of a spoon to create an even layer.
The frosting serves two purposes. First, it adds a creamy chocolate layer to the brownies. Second, it acts as the base that holds the crushed chocolate cookies in place.
You do not need perfectly smooth frosting. In fact, a slightly textured surface can make the finished pumpkin patch look more natural.
Step 4: Create the Chocolate “Dirt”
Sprinkle 1 cup of crushed chocolate cookies over the frosting.
Try to distribute the crumbs evenly across the entire surface.
The crushed cookies should resemble dark garden soil. For a more realistic appearance, leave some areas with slightly larger crumbs while other areas have finer pieces.
Gently press the crumbs into the frosting if necessary so they stay in place when the brownies are sliced.
At this stage, the brownies should already start looking like a miniature garden.
Step 5: Add the Candy Pumpkins
Now comes the most fun part.
Place the candy pumpkins across the brownie surface.
Space them out so the finished brownies look like rows of pumpkins growing in a garden. You can arrange them in straight rows for a neat appearance or place them more randomly for a natural pumpkin patch.
If you plan to cut the brownies into approximately 12 portions, try to make sure each future serving will contain at least one pumpkin.
If your candy pumpkins vary in size, you can use larger pumpkins toward the center and smaller ones around the edges.
Step 6: Pipe the Green Vines
Use green icing or decorating gel to create vines around the candy pumpkins.
Simple curved lines work beautifully. Start near a pumpkin and gently pipe a winding line outward across the cookie crumbs.
Add a few small leaf shapes along the vines if you like.
The vines do not have to be identical. Slight differences actually make the pumpkin patch look more natural and handmade.
If you are decorating with children, this is an excellent step for them to help with.
Step 7: Slice and Serve
Once the decorations are finished, carefully cut the brownies into squares.
Aim for approximately 12 brownies, making sure each piece contains at least one candy pumpkin whenever possible.
Use a sharp knife and wipe it clean between cuts if the frosting or cookie crumbs begin sticking.
Transfer the brownies to a festive Halloween platter and serve.
For an extra Halloween presentation, arrange the brownies together so the different pumpkins and green vines create one large pumpkin patch across the serving tray.
Tips for the Best Pumpkin Patch Brownies
Let the Brownies Cool Completely
This is one of the most important steps.
Warm brownies can cause the chocolate frosting to soften or melt. They can also make the cookie crumbs difficult to control.
Always allow the brownies to cool completely before decorating.
Slightly Underbake for a Fudgier Texture
If you love soft, fudgy brownies, consider taking them out of the oven 2–3 minutes earlier than the standard baking time.
The brownies should still be properly baked and set, but a slightly softer center can give the finished dessert that rich, fudgy texture.
Do Not Crush the Cookies Too Finely
A mixture of fine crumbs and small cookie pieces gives the best “dirt” appearance.
If all of the cookies are pulverized into a powder, the surface can look more like chocolate dust than garden soil.
Use Different Pumpkin Candies
Candy corn pumpkins and gummy pumpkins both work well.
You can also use other pumpkin-shaped candies if you find something that fits the size and style of your brownies.
Pipe Simple Vines
Do not worry about making professional-looking icing decorations.
A few curved green lines and small leaves are enough. The combination of colors and textures is what creates the pumpkin patch effect.
Homemade Pumpkin Decorations
If you want to make the brownies feel more homemade, you can replace the packaged candy pumpkins with chocolate truffles shaped into mini pumpkins.
This takes a little more time but gives you an opportunity to customize the size and appearance of the pumpkins.
You can also make several different pumpkin shapes so the finished brownies have a more handmade appearance.
For a quick party dessert, however, ready-made candy pumpkins are the easiest option.
How to Make These Brownies Ahead
These brownies are convenient for Halloween parties because several parts can be prepared ahead of time.
You can bake the brownies a day before the event and allow them to cool completely. Store them covered until you are ready to decorate.
When you are ready to assemble the dessert, add the chocolate frosting, crushed cookies, candy pumpkins, and green icing.
Decorating them shortly before serving can help keep the cookie “dirt” looking fresh and textured.
If you need to prepare the entire dessert in advance, keep the finished brownies in an airtight container.
How to Store Pumpkin Patch Brownies
Store leftover brownies in an airtight container at room temperature for up to 3 days.
Keep the container away from direct sunlight or sources of heat, especially if the room is warm.
When stacking decorated brownies, place parchment paper between layers if needed to help prevent the decorations and frosting from sticking together.
For the best appearance, keep the brownies in a single layer whenever possible.
Serving Ideas
These Pumpkin Patch Brownies are already festive, but a few simple presentation ideas can make them even more fun.
Halloween Dessert Table
Arrange the brownies on a black, orange, or autumn-colored platter alongside other Halloween desserts.
The dark chocolate cookie crumbs contrast beautifully with the orange pumpkins and green vines.
Halloween Party
Cut the brownies into smaller portions if you are serving a large crowd. Smaller squares make them easier for guests to grab while leaving room for other desserts.
Family Baking Night
Let everyone decorate a section of the brownies. Children can add pumpkins while adults handle the green icing and slicing.
School or Community Gathering
The brownies are easy to portion, transport, and serve, making them a convenient choice for a Halloween-themed gathering.
Frequently Asked Questions
Can I use homemade brownies instead of boxed brownie mix?
Yes. A homemade brownie recipe can be used instead of boxed mix. Just bake the brownies in a 9×13-inch pan so there is enough surface area for the decorations.
Can I use a different frosting?
Yes. Chocolate frosting works particularly well because it blends naturally with the cookie “dirt,” but you can experiment with other chocolate-based frostings if desired.
What can I use instead of candy pumpkins?
Candy corn pumpkins and gummy pumpkins are both suitable. You can also use chocolate truffles shaped into pumpkins for a more homemade decoration.
How do I make the brownies extra fudgy?
For a fudgier result, slightly underbake the brownies by about 2–3 minutes. Be sure they are still properly baked and set before removing them from the oven.
Can children help make these brownies?
Absolutely. Children can help sprinkle the cookie crumbs, place the candy pumpkins, and decorate the vines. Adult supervision is recommended for baking, hot pans, and slicing.
Can I make these brownies the day before Halloween?
Yes. You can bake the brownies a day ahead and decorate them later. Once decorated, store them in an airtight container for up to 3 days.
How many brownies does this recipe make?
The recipe is designed to make approximately 12 brownies, although the exact number will depend on how you cut the 9×13-inch pan.
Nutrition Information
The estimated nutrition information per brownie is:
| Serving Size | Calories | Protein | Carbs | Fat | Fiber | Sugar |
|---|---|---|---|---|---|---|
| 1 brownie | 310 | 3g | 45g | 14g | 2g | 30g |
Nutrition disclaimer: Nutrition facts are estimated and may vary depending on the specific brownie mix, frosting, cookies, candy, and other ingredients used. For precise dietary information, calculate the nutrition using the exact products and quantities in your recipe.
Why These Pumpkin Patch Brownies Are Perfect for Halloween
Halloween desserts are often all about presentation, and these brownies deliver a fun visual effect without requiring complicated baking techniques.
The chocolate brownie base creates a rich, dark foundation. Chocolate frosting adds another creamy layer, while crushed chocolate cookies create the appearance of garden soil. Bright orange candy pumpkins immediately establish the Halloween theme, and green icing provides the final touch with winding vines and leaves.
The result looks like an edible miniature pumpkin garden sitting on top of every brownie.
Another advantage is that the recipe is easy to adapt. You can make the brownies more rustic by varying the placement of the pumpkins and vines, or create a more organized patch by arranging the pumpkins in neat rows.
That flexibility makes the recipe suitable for both experienced bakers and beginners.
Final Thoughts
These Pumpkin Patch Brownies are a simple and creative way to turn everyday brownies into a Halloween centerpiece. With a boxed brownie mix, chocolate frosting, crushed cookies, candy pumpkins, and green icing, you can create an adorable pumpkin patch without complicated decorating skills.
The best part is that every layer contributes something different: fudgy chocolate brownies, creamy frosting, crunchy cookie crumbs, sweet pumpkin candies, and decorative green vines.
Whether you are preparing treats for a Halloween party, baking with your family, or simply looking for a festive fall dessert, these brownies are an easy project with a big visual payoff.
Bake the brownies, build your edible “soil,” plant the candy pumpkins, add a few green vines, and you have a Halloween dessert that looks as fun as it tastes.